Last Updated: March 2026 | Changelog: Added 90Hz/120Hz device-specific quick settings block; updated one-tap headshot section with tested recoil patterns.
Quick action: want Free Fire diamonds right now? Buy from AR-PAY.
Related reading: Be Pro Player in Free Fire, Free Fire MAX Redeem Codes, Top Free Fire characters.
ARPAY Gift Cards: Free Fire diamonds, How to register on AR-PAY.
Free Fire sensitivity settings are crucial for controlling your aim and camera movement, which directly affects your weapon’s stability and your ability to land precise shots. In this comprehensive guide, we’ll explore the best sensitivity configurations for Free Fire, with a focus on weapon stability, and how different settings impact your gameplay. We’ll cover optimal values for various scopes and situations, how to adjust sensitivity in-game, tips for better aim and recoil control, and even how to use the gyroscope for enhanced stability. By the end, you’ll have a clear understanding of how to tailor your sensitivity to your playstyle and device, maximizing your chances of achieving headshots and maintaining weapon stability. Unlock smoother gameplay with the right Free Fire sensitivity settings and enhance your performance instantly.
If you want to take your experience further, you can upgrade your loadout with Free Fire Gift Cards from AR-PAY for a faster, more competitive setup.
What are Free Fire Sensitivity Settings?
In Free Fire, sensitivity settings determine how fast or slow your in-game camera and aim respond to your finger movements on the screen. There are several categories of sensitivity: General (Camera), Red Dot Sight, 2x Scope, 4x Scope, Sniper Scope, and Free Look. Each controls a different aspect of aiming and movement:
- General (Camera): Base camera speed, affects how fast you turn and pan.
- Red Dot Sight: Sensitivity for iron sights and red dot, critical for close-range headshots.
- 2x Scope: Mid-range combat sensitivity with light zoom.
- 4x Scope: Medium-to-long-range engagement sensitivity.
- Sniper Scope: High-zoom (6x/8x) sensitivity, must be very low for stability.
- Free Look: Camera rotation speed when scanning without moving your joystick.
These settings are interdependent – a single tweak can change how smoothly you can aim and control recoil. For example, increasing the red dot sensitivity can make hipfire aiming faster, but it might also make your aim feel less stable if set too high. Conversely, lowering the sniper scope sensitivity improves long-range accuracy but can make moving targets harder to track. Wanna Go More Pro? Check this out: Master Free Fire in 48 Hours: Pro Tips & Tricks
Device note: These values are calibrated for mid-to-high-end devices (6GB+ RAM, 60Hz). If you’re on 90Hz or 120Hz, add 5 points to General and Red Dot. If you’re on a low-end device (2–4GB RAM), subtract 5 from all values except Sniper.
Adjusting Free Fire Sensitivity for Weapon Stability
Weapon stability in Free Fire refers to how well your crosshair stays on target during sustained fire. If your sensitivity settings are optimized, you can achieve better control over your weapon’s recoil and bullet spread. Proper sensitivity is key for:
Recoil Control
Recoil causes your crosshair to move upward or sideways after each shot. If your sensitivity is too high, recoil can throw off your aim and make it hard to land headshots. If it’s too low, you might not be able to follow up shots quickly. The right sensitivity allows you to counter recoil by pulling the aim down (for vertical recoil) or adjusting your aim between shots (for horizontal recoil).
Bullet Spread and Accuracy
Even if you’re not moving, continuous fire can cause bullet spread. Higher sensitivity can make it harder to hold your aim steady over multiple shots, especially with weapons that have higher spread (like SMGs). Conversely, lower sensitivity helps keep the crosshair tighter, improving accuracy during sustained fire.
One-Tap Settings (Optimized for Instant Kills)
One-tapping: landing a single headshot to eliminate an enemy. Depends on snap speed and crosshair placement, not spraying. These settings are tuned specifically for that purpose. What makes one-tap settings different from general settings: One-tap play requires slightly higher General and Red Dot sensitivity so your crosshair moves quickly to the head without overshooting. The trade-off is that recoil control becomes harder for sustained fire, so this setup pairs best with single-shot or low-fire-rate weapons (Deagle, AWM, Kar98k, M1887).
With AR-PAY Free Fire Gift Cards, you can instantly enhance your setup and match your improved sensitivity with stronger in-game power.
Headshot Optimization Settings
Headshots require two things: correct crosshair placement and sensitivity that doesn’t fight you when you adjust mid-fight. The settings below are balanced for consistent headshot rate — not just peak performance on the first shot.
Close-Range Headshot Settings (0–20m)
For rooms, TPP/FPP battles, and rush scenarios, you need fast Red Dot sensitivity with just enough control to compensate for recoil after the first shot.
- Red Dot: 90–94
- General: 93–97
- Key technique: Crouch before engaging to reduce bullet spread by roughly 30%, then aim at chest level and let recoil bring the aim to head height naturally.
Mid-Range Headshot Settings (20–50m)
At this range, the 2x scope dominates. You want enough sensitivity to flick to a moving target, but not so much that a flinch throws off your aim.
- 2x Scope: 78–84
- 4x Scope: 67–73
- Key technique: Short bursts of 3–4 shots rather than continuous spray. Reset after each burst to reset recoil to zero.
Long-Range Headshot Settings (50m+)
Sniping headshots are about eliminating movement from the equation. Lower sniper sensitivity is always better here.
- Sniper Scope: 30–40
- 4x Scope (AR at distance): 62–68
- Key technique: Wait for the enemy to stop moving, aim at the upper chest, and compensate for any bullet drop on high-zoom shots.
Tracking Moving Targets
In fast-paced fights, you often need to track moving enemies. A well-balanced sensitivity allows you to smoothly follow a target’s movement, increasing your chances of landing shots. In essence, sensitivity settings act as the “muscle memory” for your aim. If they’re too high, your aim will be erratic and unstable; if they’re too low, you might struggle to react quickly. Finding the optimal sensitivity is about finding a sweet spot where you can move and aim with both speed and precision.
Apply These Settings Instantly
Upgrade your gameplay with the right setup and the right loadout.
- Instant Free Fire diamonds delivery
- Secure checkout with multiple payment methods
- Works globally
Best Free Fire Sensitivity Settings for Different Situations
The ideal sensitivity values can vary depending on your playstyle, device, and the situation (close-range vs. long-range combat). Below are recommended sensitivity settings for each category, tailored for different scenarios:
General Free Fire Sensitivity (Camera)
General sensitivity controls your base camera movement. A higher general sensitivity is great for aggressive play and fast turns, while a lower value provides more stability for slower movements. Here are recommended ranges for general sensitivity:
- Aggressive Play (Rushing)
For players who like to push into fights quickly, a high general sensitivity is ideal. A setting around 95–100 is common for aggressive close-range combat. This allows you to turn 180° and react to threats in an instant. For example, a general sensitivity of 100 is used by many top players to ensure they can pivot and aim as fast as possible in clutch situations .
- Balanced/All-Rounder
A balanced general sensitivity around 90–95 is suitable for players who switch between rushing and holding angles. This provides a good balance of speed and control. It’s the default or starting point for many players, as it’s easy to adjust from here .
- Defensive/Steady Play
If you prefer a more measured approach, you might lower the general sensitivity. A setting around 80–85 can make you turn slower, which can help when you’re trying to maintain a steady aim and avoid overshooting targets. This is often chosen by players who focus on holding angles and precision shots.
- Low-End Devices
If you’re on a low-end phone (2–4GB RAM), using a higher general sensitivity can compensate for the device’s lower performance and input lag. A range of 90–95 is recommended to ensure smoother movement and faster reaction times .
- High-End Devices:
High-end phones (6GB+ RAM) can handle lower sensitivity values more smoothly. If you have a high-end device, you could try 80–85 general sensitivity for a bit more control, as the device’s superior hardware won’t lag as much .
Red Dot Sight Sensitivity in Free Fire
The red dot sight is the go-to for most close-range combat and mid-range engagements without a scope. It offers a slight zoom and is very fast to aim with. The recommended red dot sensitivity values are:
- Close-Range and Aggressive
For fast-paced, close-quarters combat (where you might hip-fire or quickly scoped shots), a high red dot sensitivity is beneficial. A range of 90–95 is common for aggressive players. This allows you to quickly snap your aim onto enemies and even one-tap headshot with high fire-rate weapons. For instance, many pros use around 95 red dot sensitivity to get those quick hipfire headshots .
- Balanced/All-Rounder
A setting around 85–90 for red dot is often recommended as a balanced value. It’s fast enough for close fights but also provides enough control for mid-range drag shots. This is a popular setting among players who use red dot sights extensively .
- Defensive/Steady
If you’re more defensive and prefer to hold angles with a red dot, you might lower the sensitivity to 80–85. This gives you a bit more control and makes it easier to aim precisely when firing at enemies from cover. It’s a safer setting for players who might struggle with very high sensitivity.
- High-End Devices
High-end devices can handle slightly higher red dot sensitivity. You could try up to 95–100 if your device’s performance allows it. Just be careful not to go too high, as very high sensitivity can lead to shaky aim.
- Low-End Devices
On low-end devices, a lower red dot sensitivity (around 85–90) can help reduce any lag or instability. It prevents the aim from feeling too twitchy, especially when using a red dot on a phone with limited processing power .
2x Scope Sensitivity in Free Fire
The 2x scope is useful for mid-range combat – it provides a bit of zoom to see enemies at a distance, but not so much that your field of view narrows. The recommended 2x scope sensitivity values are:
- Aggressive Mid-Range
For players who like to engage at medium distances while moving, a higher 2x scope sensitivity can be helpful. A range of 85–90 is common for aggressive play. This allows you to quickly aim and track enemies at mid-range. Many pros use around 85 2x scope sensitivity to smoothly aim and even shotgun-burst enemies at medium range .
- Balanced/All-Rounder
A setting around 75–85 for 2x scope is a balanced value that works for many players. It’s fast enough to track moving targets but also provides enough control to handle the slight zoom. This is a popular choice for all-rounders who use a mix of close and mid-range weapons .
- Defensive/Steady
If you tend to hold angles or shoot from cover at mid-range, you might lower the 2x scope sensitivity to 70–75. This gives you a more stable aim and makes it easier to land precise shots on enemies at mid-range. It’s a safer setting for players who want to be very accurate when sniping from a distance.
- High-End Devices
High-end devices can handle slightly higher 2x scope sensitivity. You could try up to 85–90 if your device’s performance is smooth. However, be cautious not to go too high, as a very high 2x scope sensitivity can make it hard to control the recoil when spraying.
- Low-End Devices
On low-end devices, it’s often better to keep 2x scope sensitivity lower (around 70–75). This prevents any instability or lag when using the 2x scope, ensuring your aim stays steady at mid-range .
4x Scope Sensitivity in Free Fire
The 4x scope is used for medium to long-range combat and is the most common scope in Free Fire. It offers a moderate zoom and requires a bit more control. The recommended 4x scope sensitivity values are:
- Aggressive Long-Range
For players who engage at longer distances but still like to be aggressive (maybe using ARs or SMGs with 4x scope), a slightly higher 4x sensitivity can be useful. A range of 75–80 is common for aggressive long-range play. This allows you to track enemies at longer distances without feeling too sluggish.
- Balanced/All-Rounder
A setting around 65–75 for 4x scope is a balanced value that works for many players. It provides a good balance of speed and stability for mid to long-range shooting. This is a popular choice for players who use 4x scopes frequently .
- Defensive/Steady
If you prefer a more defensive approach or are new to 4x scope, you might lower the sensitivity to 60–65. This gives you a very stable aim at long range, making it easier to land precise shots. It’s a safer setting for players who want to focus on accuracy rather than speed.
- High-End Devices
High-end devices can handle slightly higher 4x scope sensitivity. You could try up to 75–80 if your device’s performance is smooth. However, be cautious not to go too high, as a very high 4x sensitivity can make it hard to control recoil when spraying at long range.
- Low-End Devices
On low-end devices, it’s often better to keep 4x scope sensitivity lower (around 60–65). This prevents any instability or lag when using the 4x scope, ensuring your aim stays steady at longer distances .
Sniper Scope Sensitivity in Free Fire
The sniper scope (8x scope on the AWM, 6x scope on the Parafal, etc.) is for very long-range precision shooting. Because of the extreme zoom, it requires an extremely low sensitivity to keep the crosshair stable. The recommended sniper scope sensitivity values are:
- Precision Sniping
For maximum accuracy when sniping at very long distances, the sniper scope sensitivity should be set to a very low value. A range of 30–40 is common for optimal long-range sniping. This ensures that even the slightest finger movement doesn’t throw off your aim . Professional snipers often use around 35 sniper scope sensitivity to achieve that rock-steady aim for Best Sensitivity free fire one-tap headshots 2025.
- Balanced Sniping
If you want a bit more flexibility while sniping (for example, quickly adjusting aim to track moving targets or doing quick-scoping), you might use a slightly higher sniper scope sensitivity, around 40–50. This gives you a bit more control but still maintains good stability.
- High-End Devices
High-end devices can handle a bit higher sniper scope sensitivity if you find the default too slow. However, even on high-end devices, it’s recommended to keep it very low (around 30–40) to get the most stability. Any higher might make it harder to land precise shots.
- Low-End Devices
On low-end devices, you may need to increase the sniper scope sensitivity slightly (to around 40–50) to make aiming with the 8x scope manageable. This compensates for any lag or performance issues, but you’ll still want to keep it lower than the default to maintain stability .
Free Look (Camera) Sensitivity in Free Fire
Free Look sensitivity controls how fast your camera spins when you use the free look button (the right thumbstick or free look icon). This is crucial for quickly scanning the environment without moving your joystick. The recommended free look sensitivity values are:
- Aggressive Scanning
For aggressive players who like to quickly check their surroundings, a higher free look sensitivity is beneficial. A range of 80–90 is common for fast free looking. This allows you to spin around 360° quickly to spot enemies or threats .
- Balanced Scanning
A setting around 70–80 for free look is a balanced value that works for many players. It’s fast enough to scan the area without being too twitchy. This is a popular choice for all-rounders who want to be aware of their surroundings.
- Defensive Scanning
If you prefer a more defensive approach, you might lower the free look sensitivity to 60–70. This gives you a more controlled scan, which can be helpful if you want to be precise about what you’re looking at. It’s a safer setting for players who might overshoot when scanning.
- High-End Devices
High-end devices can handle slightly higher free look sensitivity. You could try up to 80–90 if your device’s performance is smooth. Just be careful not to go too high, as a very high free look sensitivity can make it hard to stop scanning exactly where you want.
- Low-End Devices
On low-end devices, it’s often better to keep free look sensitivity lower (around 60–70). This prevents any lag or instability when using the free look button, ensuring your scans are smooth and accurate . It’s important to note that these are general recommendations. Your optimal sensitivity may vary based on your device’s performance and your personal preference. Many players also use different setups for different weapons or playstyles. For example, you might have a slightly higher sensitivity for an SMG (which has high fire rate but less recoil) and a lower sensitivity for an AR (which has more recoil but less spread). Experimentation is key – tweak the settings in the training ground to see what feels most comfortable and effective for you.
How to Adjust FF Sensitivity.com
Adjusting your sensitivity in Free Fire is straightforward. Here’s a step-by-step guide:
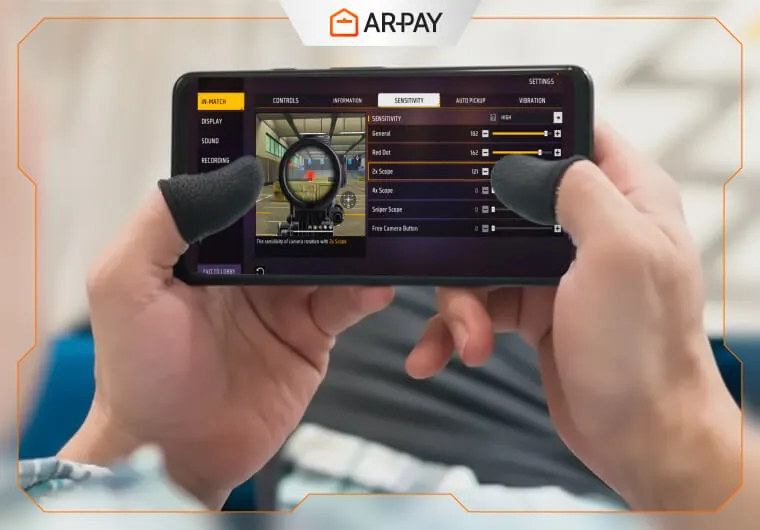
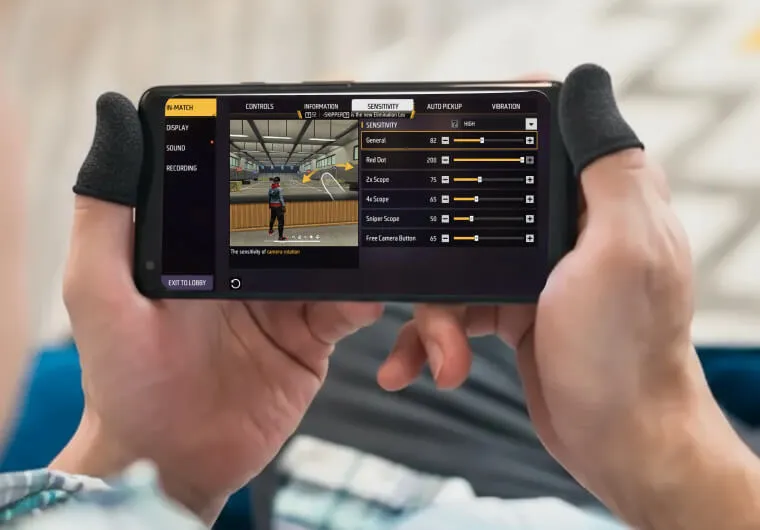
- Open the Settings Menu: While in the game lobby, tap the gear icon in the top-right corner to open the settings menu.
- Go to the Sensitivity Tab: In the settings menu, click on the “Sensitivity” option (usually located in the left-hand menu). This will display your current sensitivity settings for each category .
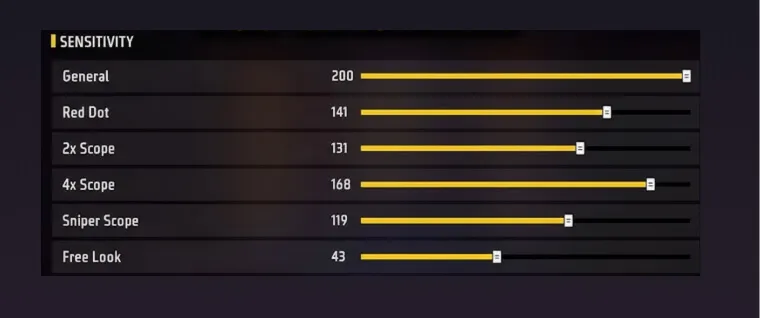
- Adjust the Sliders: You’ll see sliders for General, Red Dot, 2x Scope, 4x Scope, Sniper Scope, and Free Look. Drag the sliders to the desired values. Free Fire uses a percentage-based sensitivity system, so you can set each to a specific value (e.g., 90 for General, 85 for Red Dot, etc.)
- Save and Test: After adjusting the settings, close the menu. The changes will automatically save. It’s a good idea to test your new sensitivity in the Training Ground to ensure they feel right. Practice aiming, shooting, and moving around in the training ground to see if the new sensitivity gives you better control over your weapon and camera.
- Fine-Tune as Needed: If you find that your aim feels too fast or too slow after the change, you can go back and adjust the sliders further. Remember to make changes incrementally (e.g., change a setting by 5 points at a time) and test each change to avoid overwhelming yourself.
Best FF Sensitivity Settings for High FPS and 90/120Hz
Having a high frame rate (FPS) and a high refresh rate display (like 90Hz or 120Hz) can greatly enhance your gaming experience, and your sensitivity settings should be optimized to take full advantage of these features. Here’s how to tailor your sensitivity for high FPS and high refresh rate devices:
- Higher Sensitivity with High FPS
Devices that can maintain a consistent 60 FPS or higher can handle more aggressive sensitivity settings. In fact, if your device has a high refresh rate, you might even increase your sensitivity slightly for faster movements and reactions . The smoother frame rate ensures that even at higher sensitivity, your aim remains stable and doesn’t feel jittery. For example, if you have a 90Hz or 120Hz phone, you might try increasing your general sensitivity to around 95–100 (if it wasn’t already) to capitalize on the smooth visuals.
- Gyroscope and High FPS
If you’re using the gyroscope (more on that later), a high FPS can make the gyro aim feel much more precise. The gyroscope uses the device’s accelerometer to control aim, and with more frames per second, the aim adjustments from the gyro will be smoother and more responsive. This can give you a competitive edge in recoil control and aiming precision.
- 90Hz/120Hz Refresh Rate
A 90Hz or 120Hz display means the screen refreshes 90 or 120 times per second, making motion appear smoother. When using such a display, your eyes will perceive faster movements more smoothly. This allows you to potentially use slightly higher sensitivity than you would on a 60Hz display. For instance, if you were comfortable with a general sensitivity of 85 on 60Hz, you might find 90 or 95 on 90Hz to be comfortable. Just make sure to test and not go so high that your aim becomes uncontrollable.
- Device-Specific Optimization
Modern devices (especially those with 6GB+ RAM and powerful GPUs) can handle high sensitivity better. If you have a high-end device, don’t be afraid to push the limits of sensitivity a bit more. However, even on high-end devices, ensure you have the game running at the highest possible FPS (which you can usually do by enabling “High FPS” or “90Hz” mode in the graphics settings). This will make your gameplay feel buttery smooth and allow you to use more aggressive sensitivity settings with confidence.
- Testing and Calibration
When using a high FPS device, spend time in the training ground to calibrate your sensitivity. Start with your usual settings and then try increasing them slightly. Notice how the aim feels – does it feel faster and more responsive? If yes, you might be able to keep those higher settings. If you start to feel any instability, dial it back. The key is to find the highest sensitivity where your aim remains steady. This will vary from person to person, but many high-end device users report that they can use a bit higher sensitivity than average and still maintain control, thanks to the smooth performance.
8 Tips for Better Aim and Recoil Control For FF
While sensitivity settings are crucial, they’re not the only factor in achieving better aim and recoil control. Here are some additional tips and techniques to help you improve your aim and keep your weapon stable:
Practice in the Training Ground
The Training Ground in Free Fire is your best friend for improving aim. Spend time there practicing different weapons and scenarios. Focus on recoil control drills – fire short bursts and learn the recoil pattern of each gun. Practice drag headshots (aiming slightly below the head and pulling up) to improve precision. The more you practice, the more comfortable you’ll become with different guns and sensitivity settings .
Use Attachments for Recoil Control
Don’t forget to use attachments on your weapons. Attachments like foregrips, stocks, and muzzles can significantly reduce recoil and improve stability. A foregrip reduces both vertical and horizontal recoil, while a stock improves weapon stability and reduces the delay in recoil recovery. Equipping these attachments can make it easier to control recoil even without adjusting sensitivity . Always try to use the best attachments available (Level 3 if possible) to stabilize your weapons.
Master Recoil Patterns
Each gun has a distinct recoil pattern. Spend time learning the pattern of your favorite weapons. For example, the AK-47 has a strong upward recoil that you need to counter by pulling down, while the UMP has more horizontal recoil. By knowing the pattern, you can adjust your aim in anticipation. Many players use a technique called “split firing” – firing in short bursts (3–4 shots) and then pausing to reset the recoil before firing again. This helps keep your shots more accurate and manageable . Practice this with different weapons to build muscle memory.
Crouch and Prone for Stability
When engaging enemies at a distance, consider crouching or going prone. Crouching and prone stances reduce weapon recoil and improve accuracy. This is a simple trick that can make a big difference, especially with weapons like the AK-47 or M4A1. Even a small reduction in recoil can translate to more headshots and better survival .
Use Aim Assist Wisely
Free Fire has an aim assist feature that helps keep your aim on target, especially when shooting at moving enemies. While aim assist can be helpful in close fights, it’s important not to rely on it too much for long-range shots. In long-range engagements, you should aim manually as much as possible, using aim assist only to get a slight edge. On the other hand, in close-quarters combat, aim assist can help you land more shots. Experiment with it to see what works best for your playstyle, but remember that true skill comes from manual aiming.
Adjust DPI for Accuracy
As mentioned earlier, changing your device’s DPI can affect your aim. Some players find that increasing the DPI slightly (e.g., from 400 to 450) can make their aim more responsive and reduce any sluggishness. However, this is a very personal preference and can vary by device. If you decide to adjust DPI, do so gradually and test in-game. Many players report that a well-calibrated DPI can complement their in-game sensitivity for more accurate shots .
Improve Reaction Time and Reflexes
Sensitivity settings and practice can only take you so far – improving your reaction time and reflexes is also important. Exercises like finger drills (quickly tapping buttons on your screen) and playing other fast-paced games can help improve your hand-eye coordination. Additionally, maintaining good posture and focus during matches can help you react faster to threats.
Learn from the Pros
Watch professional Free Fire players’ streams or videos. Pay attention to their sensitivity settings and gameplay techniques. While you might not be able to copy their exact settings (due to different devices), you can learn from their strategies and aim techniques. For example, you might notice that a pro uses a slightly different sensitivity for different weapons or that they use a specific method for recoil control. Incorporate what you learn into your own playstyle. By combining these tips with the right sensitivity settings, you’ll be well on your way to better aim and recoil control. Remember, practice is key – the more you play and experiment, the more you’ll understand what works best for you. With time and effort, you’ll develop the muscle memory and skills to consistently land headshots and maintain weapon stability in Free Fire.
Gyroscope for Recoil Control
The gyroscope lets you tilt your phone to control aim. When set up correctly, it’s the single most effective tool for recoil reduction in Free Fire.
How to Enable Gyroscope
Settings → Controls → Gyroscope → Enable for “Scope Only” (recommended) or “Always On.” Start with Scope Only — it activates the gyro only when you open a scope, which is easier to learn and covers the highest-impact use case (scoped recoil).
Using Gyro for Recoil Control
When you fire and the crosshair climbs upward, tilt your phone slightly downward (toward you) to counteract it. At 25–35 gyro sensitivity, a small tilt brings the aim back to target level without overshooting. This is especially effective with the AK-47, M4A1, and Groza — all high-recoil ARs where manual drag shots are harder.
Gyro vs. No Gyro
Gyro gives an edge in recoil control and long-range precision. The trade-off is that it requires physical device movement, which can be tiring in long sessions and is harder to use while lying down or gaming on a desk. If you’re not willing to commit 1–2 weeks of practice, skip it — a well-tuned manual sensitivity setup is competitive without it.
Conclusion
Mastering Free Fire sensitivity settings is the first step toward improving your gameplay and achieving consistent headshots.
But real progress comes when your skills and your loadout work together.
Upgrade your Free Fire experience today with AR-PAY Gift Cards and unlock the tools you need to dominate ranked matches and perform at your best.
You fixed your sensitivity.
Now remove the last bottleneck.
Top competitive players don’t just optimize aim, they optimize loadout.Instantly top up Free Fire diamonds using ARPay Gift Cards and unlock elite passes, weapon upgrades, and ranked-ready gear without delays.Use code FREEFIRE2 and save 2%.
Buy a Free Fire Gift Card and upgrade your ranked push now.
FAQs
What are the best Free Fire sensitivity settings for headshots in 2026?
The best sensitivity settings for consistent headshots in Free Fire 2026 depend on your playstyle and device, but here’s a recommended setup for most players:
- General (Camera): 95–100
- Red Dot Sight: 90–95
- 2x Scope: 80–85
- 4x Scope: 70–75
- Sniper Scope: 35–40
- Free Look: 80–85
How can I reduce weapon recoil and improve aim stability in Free Fire?
To reduce recoil and keep your weapon stable:
- Lower your sensitivity slightly for scopes (especially 4x and Sniper) to make recoil control easier.
- Use weapon attachments such as foregrips, muzzles, and stocks for reduced vertical and horizontal recoil.
- Practice drag shots and short-burst firing instead of spraying continuously.
- Crouch or go prone while firing for extra accuracy.
- Enable the gyroscope (if supported) and set its sensitivity between 25–40 to manually counter recoil by tilting your phone down.
Does using a high FPS or 90Hz/120Hz display affect sensitivity in Free Fire?
Yes, it does. Higher frame rates and refresh rates make your movements smoother and more responsive, allowing you to increase your sensitivity slightly without losing control. If you play on a 90Hz or 120Hz device, try increasing your General sensitivity by 5–10 points compared to your normal setup. For example:
- On 60Hz: General 90
- On 90Hz/120Hz: General 95–100 High-end devices handle these higher values better, giving you faster reactions and more precise aiming, especially when paired with stable FPS performance.
What is the best Free Fire sensitivity for headshots in 2026?
The most consistent headshot setup for mid-range devices in 2026: General 95, Red Dot 92, 2x Scope 82, 4x Scope 72, Sniper Scope 37, Free Look 82. For aggressive one-tap play, push General and Red Dot up to 98–100 and 93–96 respectively.
What is the best sensitivity for one-tap kills in Free Fire?
One-tap builds need higher Red Dot sensitivity (90–96) for fast crosshair snapping, paired with very low Sniper Scope sensitivity (33–38) for precision shots. The Aggressive column in the Quick Settings table above is optimized for this.
How do I stop my aim from shaking in Free Fire?
Shaky aim is almost always caused by sensitivity being too high for your device or play level. Drop your Red Dot and General sensitivity by 8–10 points, add a foregrip attachment to your weapon, and switch to burst fire. If shaking persists, your device may have touch latency issues, a lower overall sensitivity compensates for that.
Does sensitivity affect recoil in Free Fire?
Sensitivity doesn’t reduce recoil itself, but it determines how well you can manually counter it. Lower sensitivity gives you finer control to pull down against upward recoil; higher sensitivity lets you compensate faster but risks overshooting. For heavy-recoil guns like the AK-47, lower 4x sensitivity (60–68) improves controllability noticeably.
What sensitivity do Free Fire pros use?
Most professional and high-ranked players use General around 90–100, Red Dot 88–95, and very low Sniper Scope (30–40). Many also use gyroscope (25–35 sensitivity) for scope stabilization. The exact values vary per player, device, and preference, the ranges in this guide cover what the majority of competitive players land within.
What is the best gyroscope sensitivity for Free Fire?
Start at 25 for all scopes. After a week of practice, increase by 5 points if tilting feels like it’s not responding enough. Most players settle between 25–40. Keep Sniper gyro sensitivity lower than all other scopes (15–25) for long-range precision.
Should I use gyroscope or not in Free Fire?
Use gyroscope if you can commit 1–2 weeks to learning it. It provides a measurable advantage in recoil control, especially on scoped weapons. Skip it if you play casually, game at a desk, or find physical tilting uncomfortable, A refined manual sensitivity setup is fully competitive.
Use this method on AR-PAY
If you want to keep the right sensitivity settings and then top up fast, AR-PAY is the shortest path to buying Free Fire diamonds. Buy Free Fire diamonds on AR-PAY or browse Binance gift cards if you prefer wallet-based checkout.
Best Free Fire sensitivity settings table for 2026
| Use case | General | Red Dot | 2x Scope | 4x Scope | Sniper Scope | Free Look |
|---|---|---|---|---|---|---|
| Most players / balanced | 95 | 92 | 82 | 72 | 37 | 82 |
| Aggressive one-tap headshots | 98–100 | 93–96 | 82–86 | 72–76 | 35–40 | 82–88 |
| Low-end phones (2–4GB RAM) | 90–95 | 85–90 | 70–75 | 60–65 | 40–50 | 60–70 |
| High-end / 90Hz–120Hz phones | 95–100 | 95–100 | 85–90 | 75–80 | 30–40 | 80–90 |